I actually didn’t realize this until I went to write this post, but I’ve never had my own fridge. Whether living with my family or roommates, I’ve always been in a situation where fridge space was tight. And since most of us share our fridge with at least one person, we all know the struggle of keeping a fridge organized. Heck! Even living solo probably means a disorganized fridge at times.
As I finished off bigger projects in my house (like my dining room and the floors), it’s now time to start really honing in on organization in each room. Y’all might remember that we already tackled my closet and pantry with the help of my friends at Neat Method, and now it’s on to the fridge. Not gonna lie, I wasn’t super excited about organizing my fridge until we really got in there. Then, hours later I was legit bursting with excitement because it was so freaking fun. And the results just make me happy every single time I open those fridge doors – which is like 100 times a day.
Along with Neat Method, I wanted to pull together the tips that really made a difference in our fridge. Y’all might not even think you need to organize your fridge, but if you’ve ever found old food in the back, don’t have much space, or simply like your areas organized, you’ll love this post. A jump on your spring cleaning, too #YAY! And of course certain things might vary slightly depending on your living situation and what you buy, but in general, lots of helpful knowledge below for y’all!
Before diving into the post, I wanted to let y’all know about a HUGE sale The Container Store is having this month! They’re having their annual Kitchen Sale from NOW until the end of the month (April 1, 2018 to be exact). There are hundreds of kitchen and pantry products all for 25% OFF. YAY – let’s get our Spring cleaning on, shall we?!
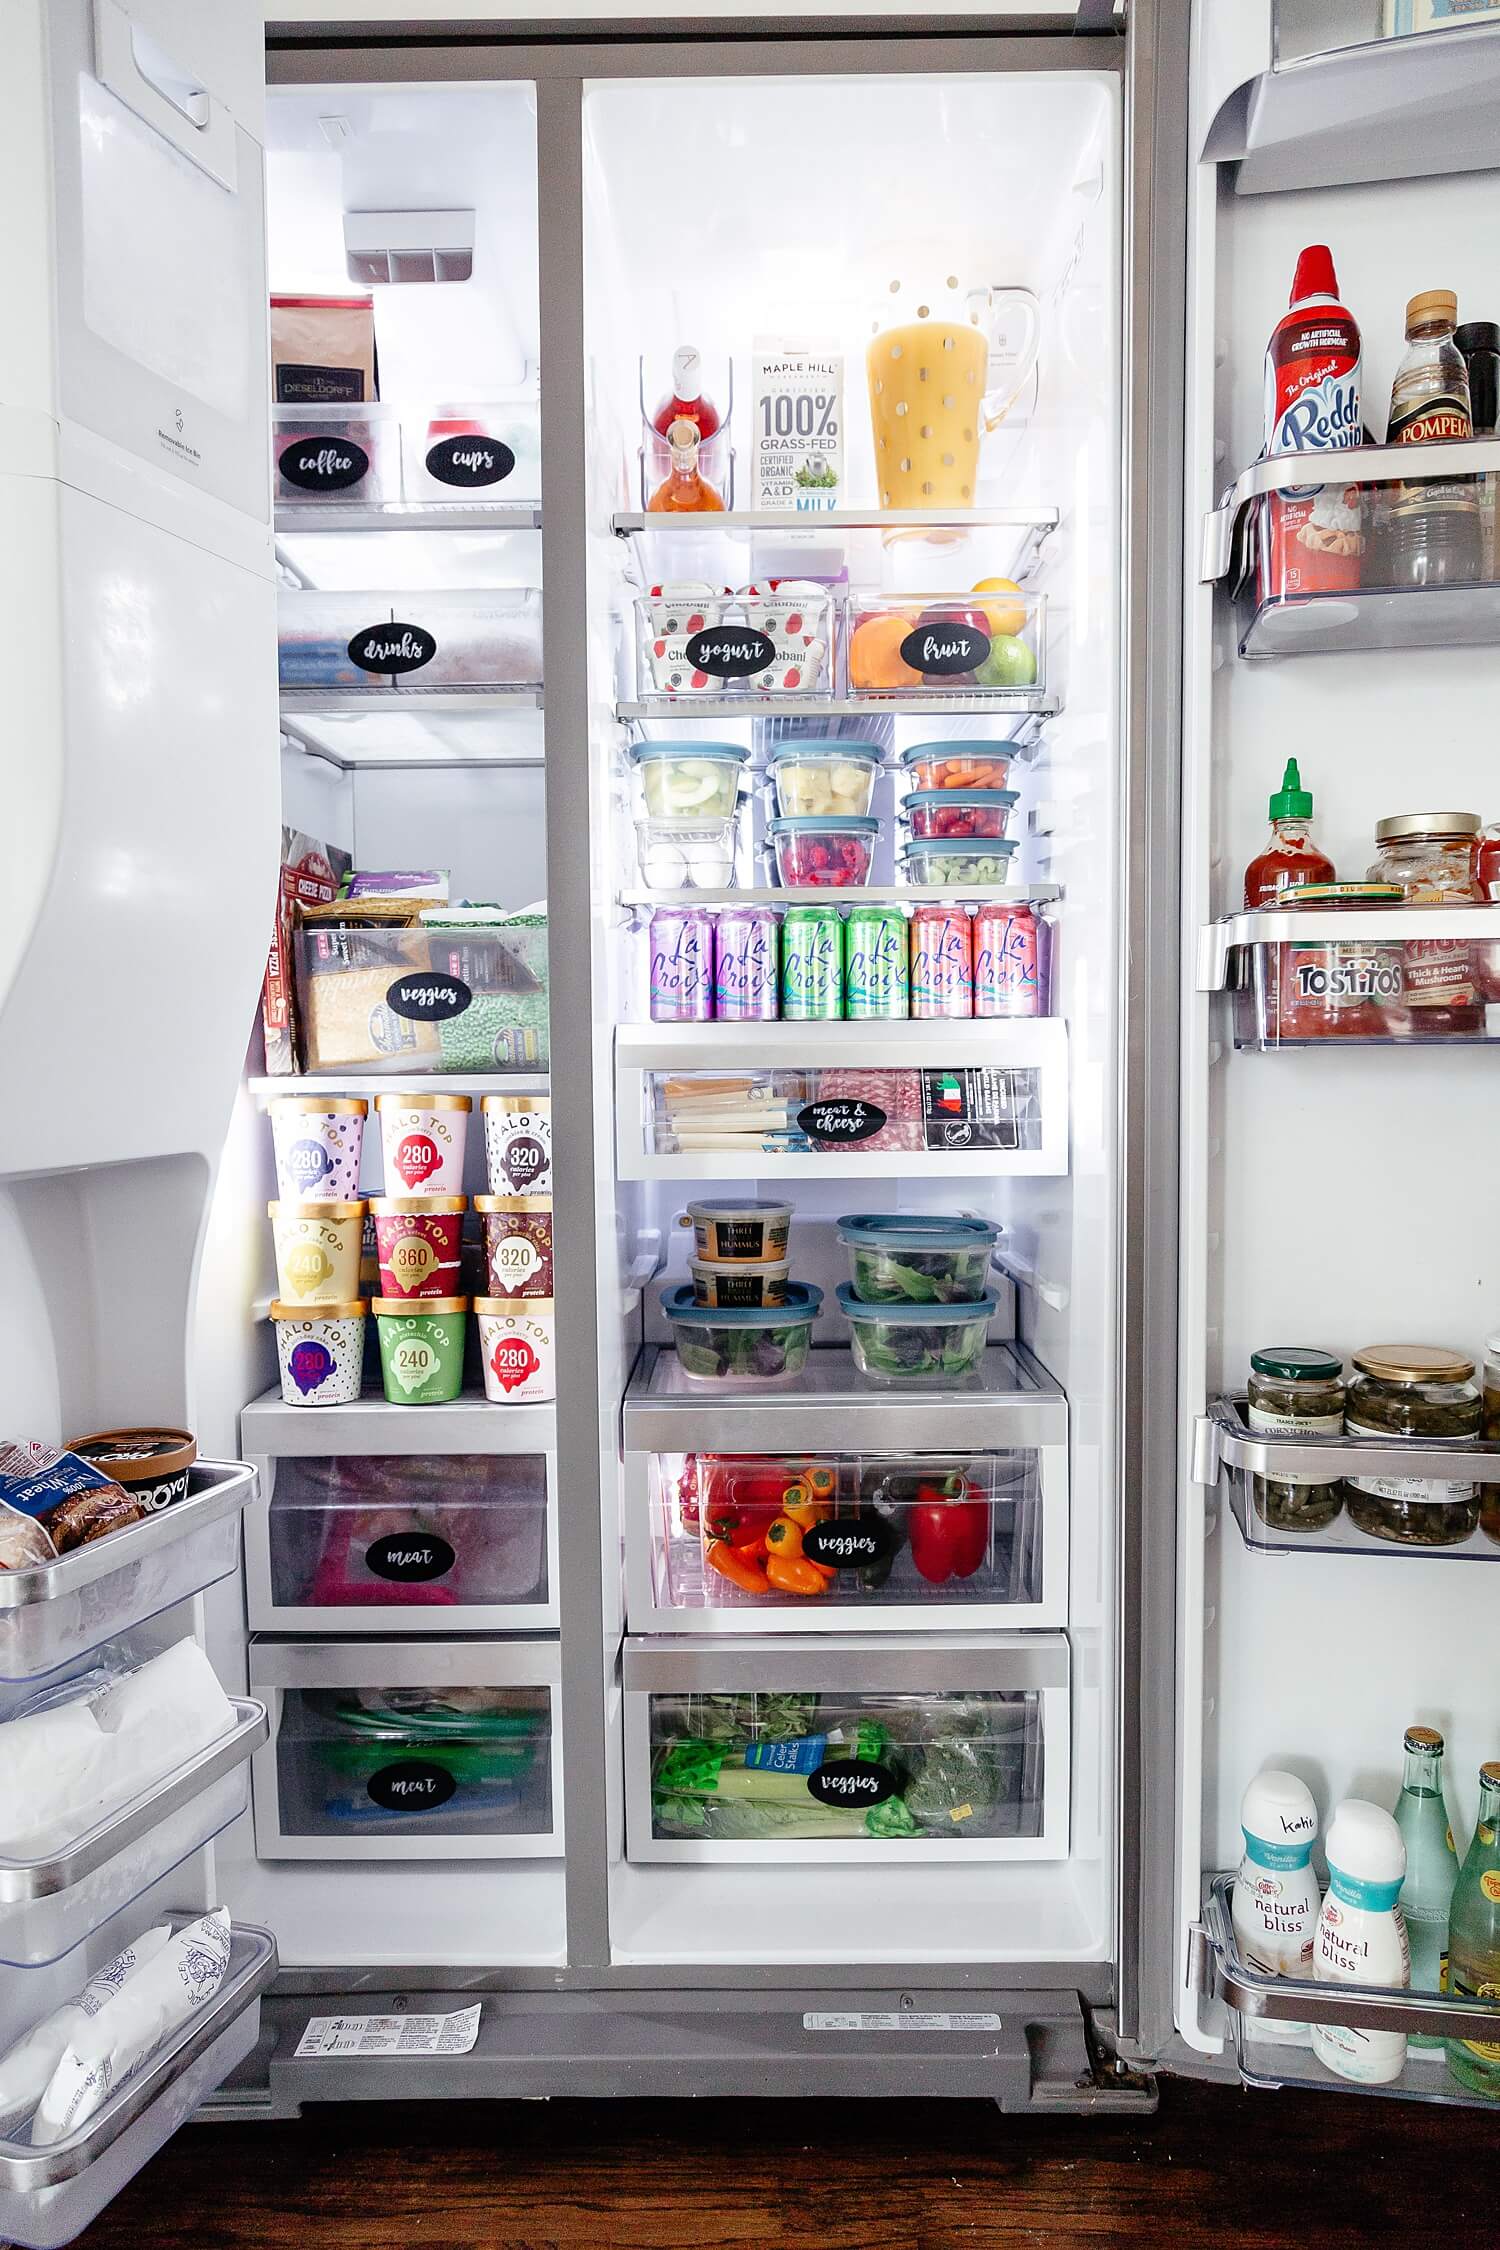
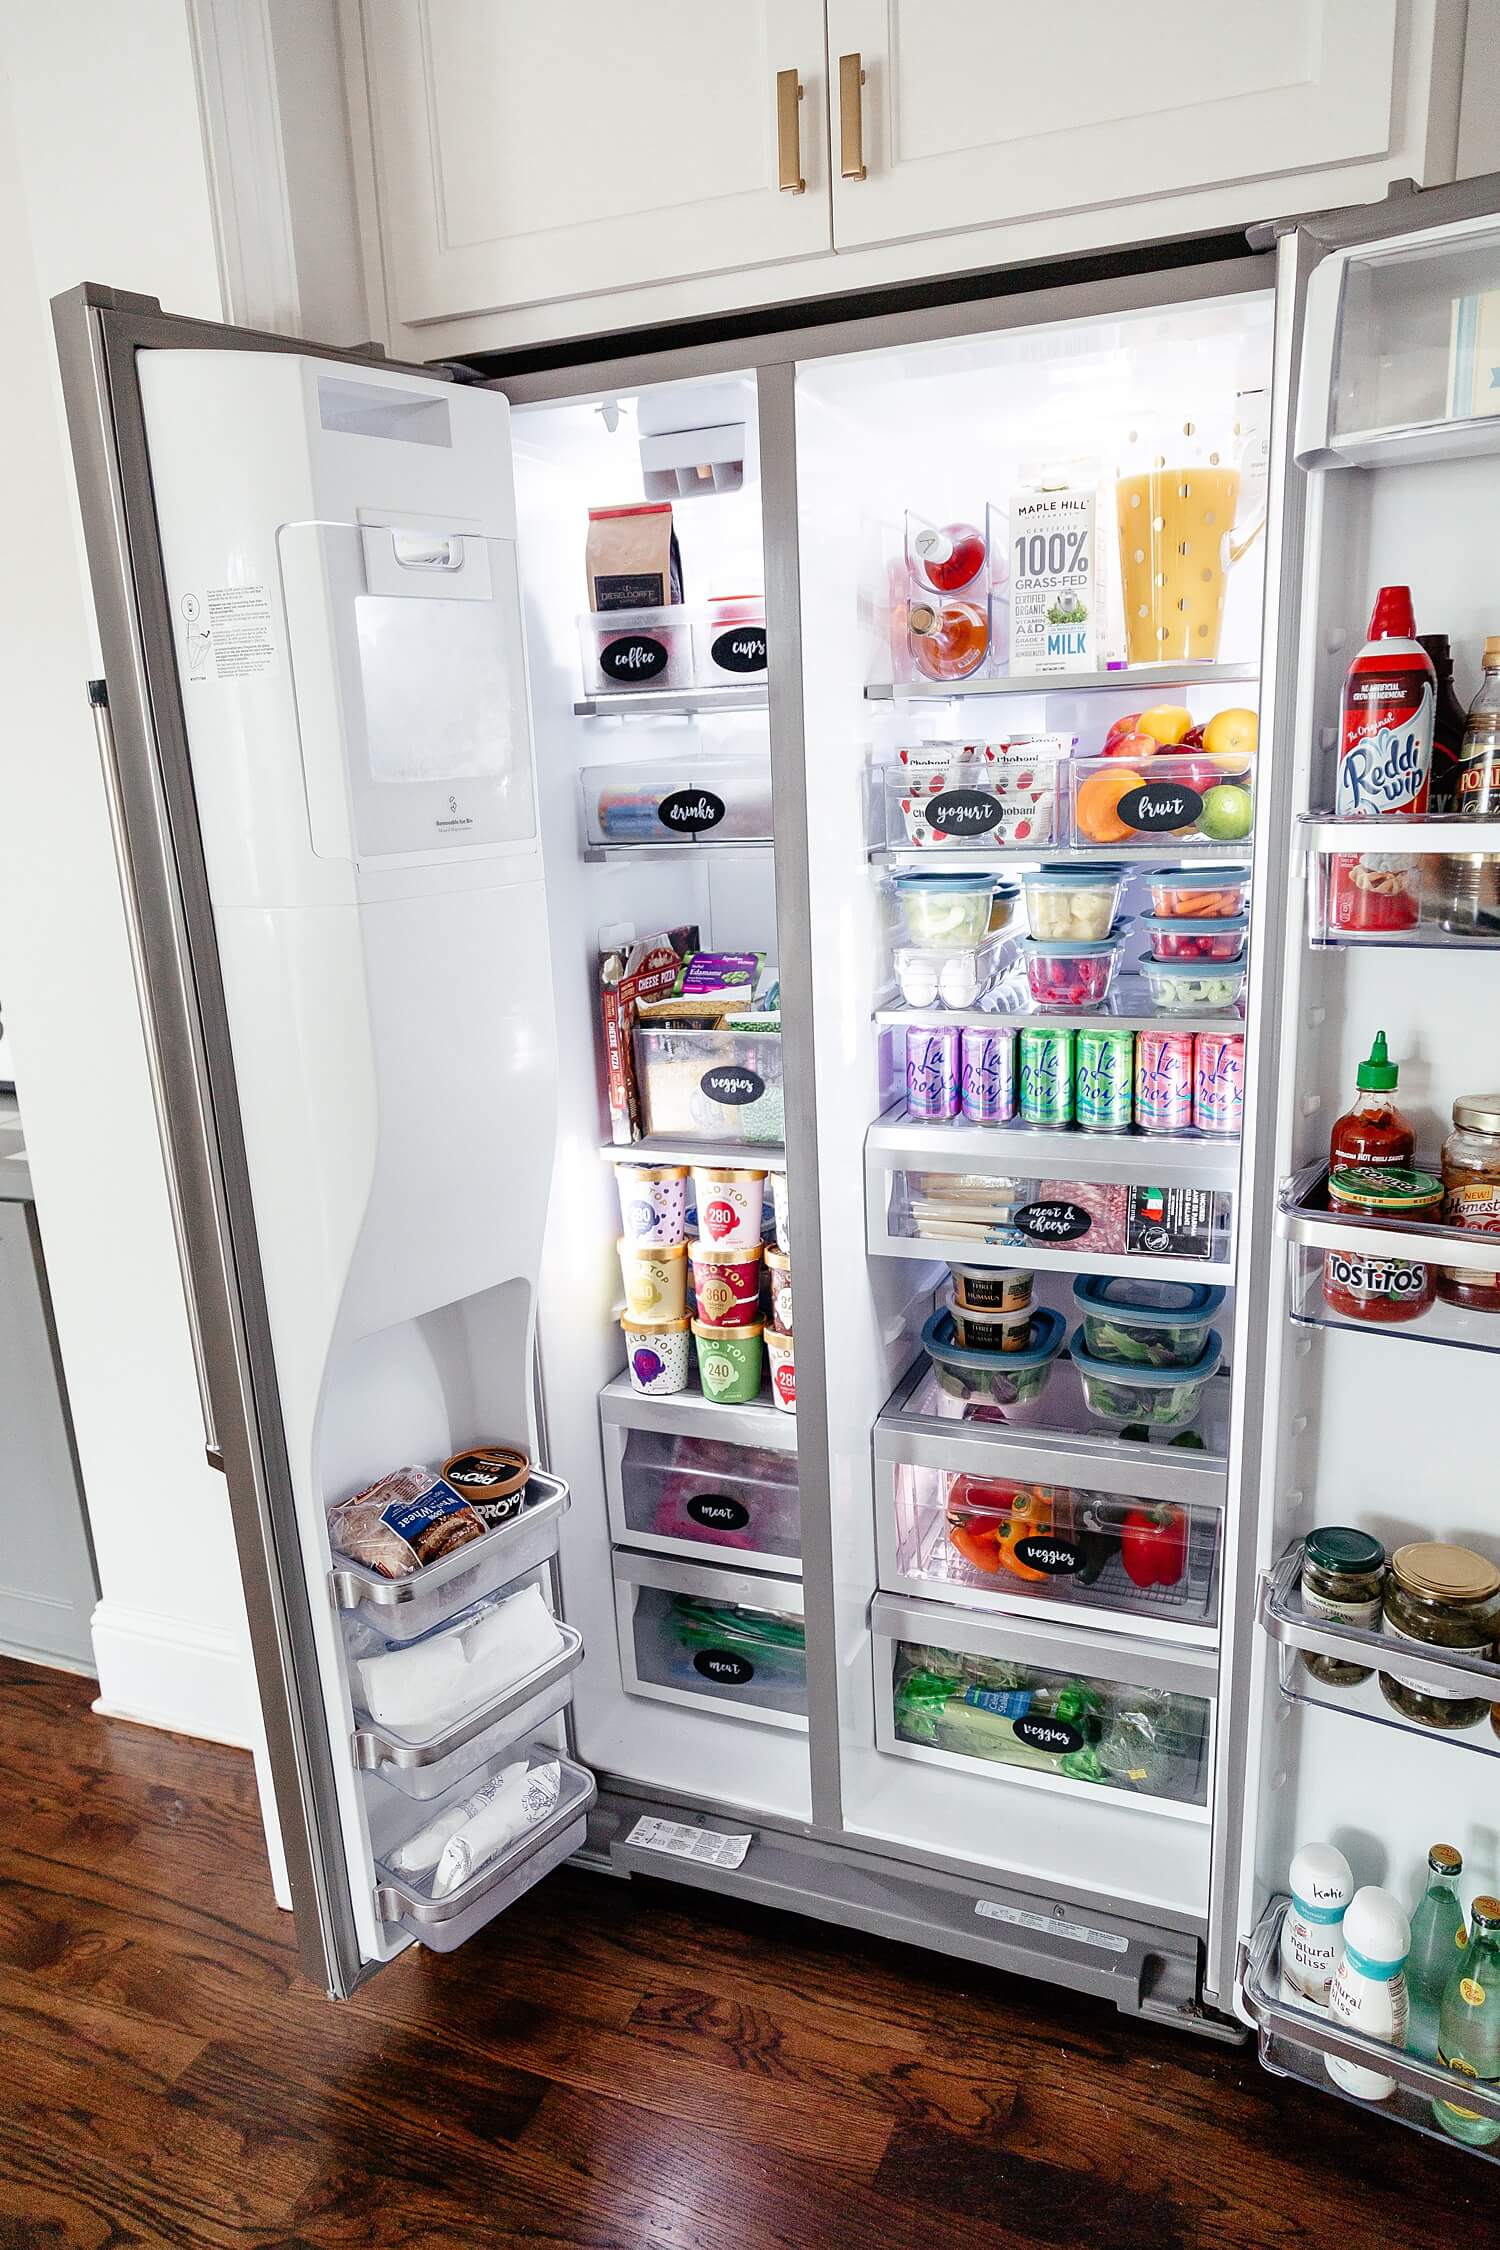
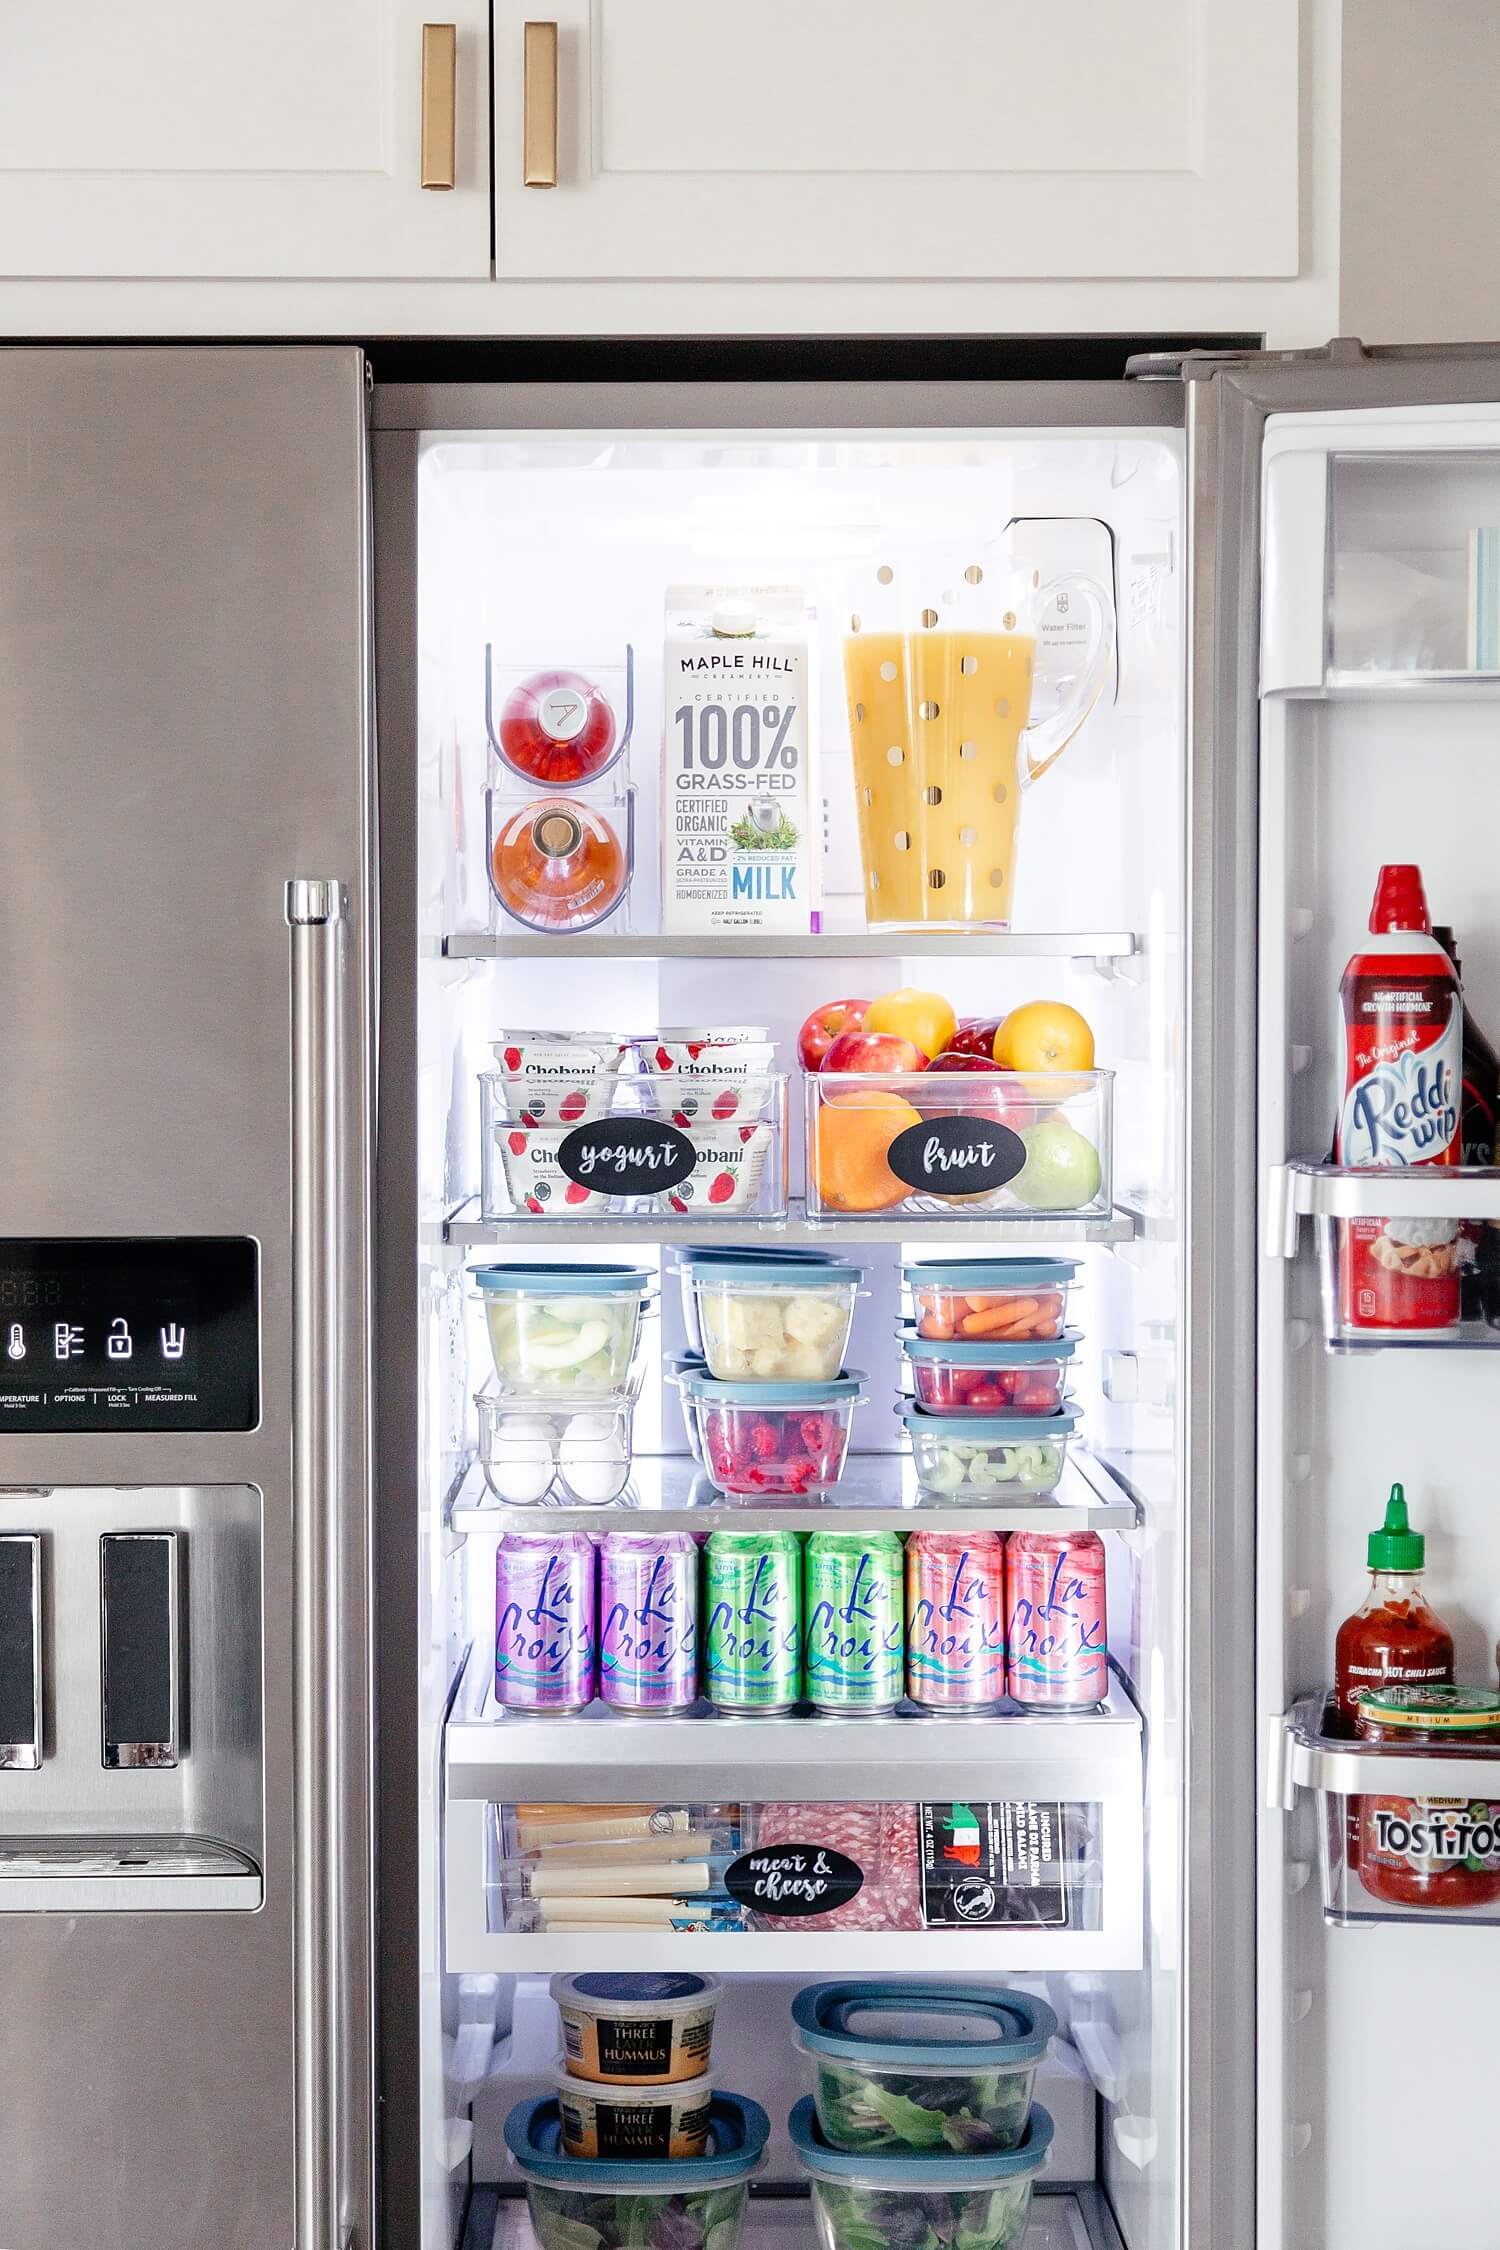
On the top shelf, we used these horizontal wine stacking treys to store wine horizontally.
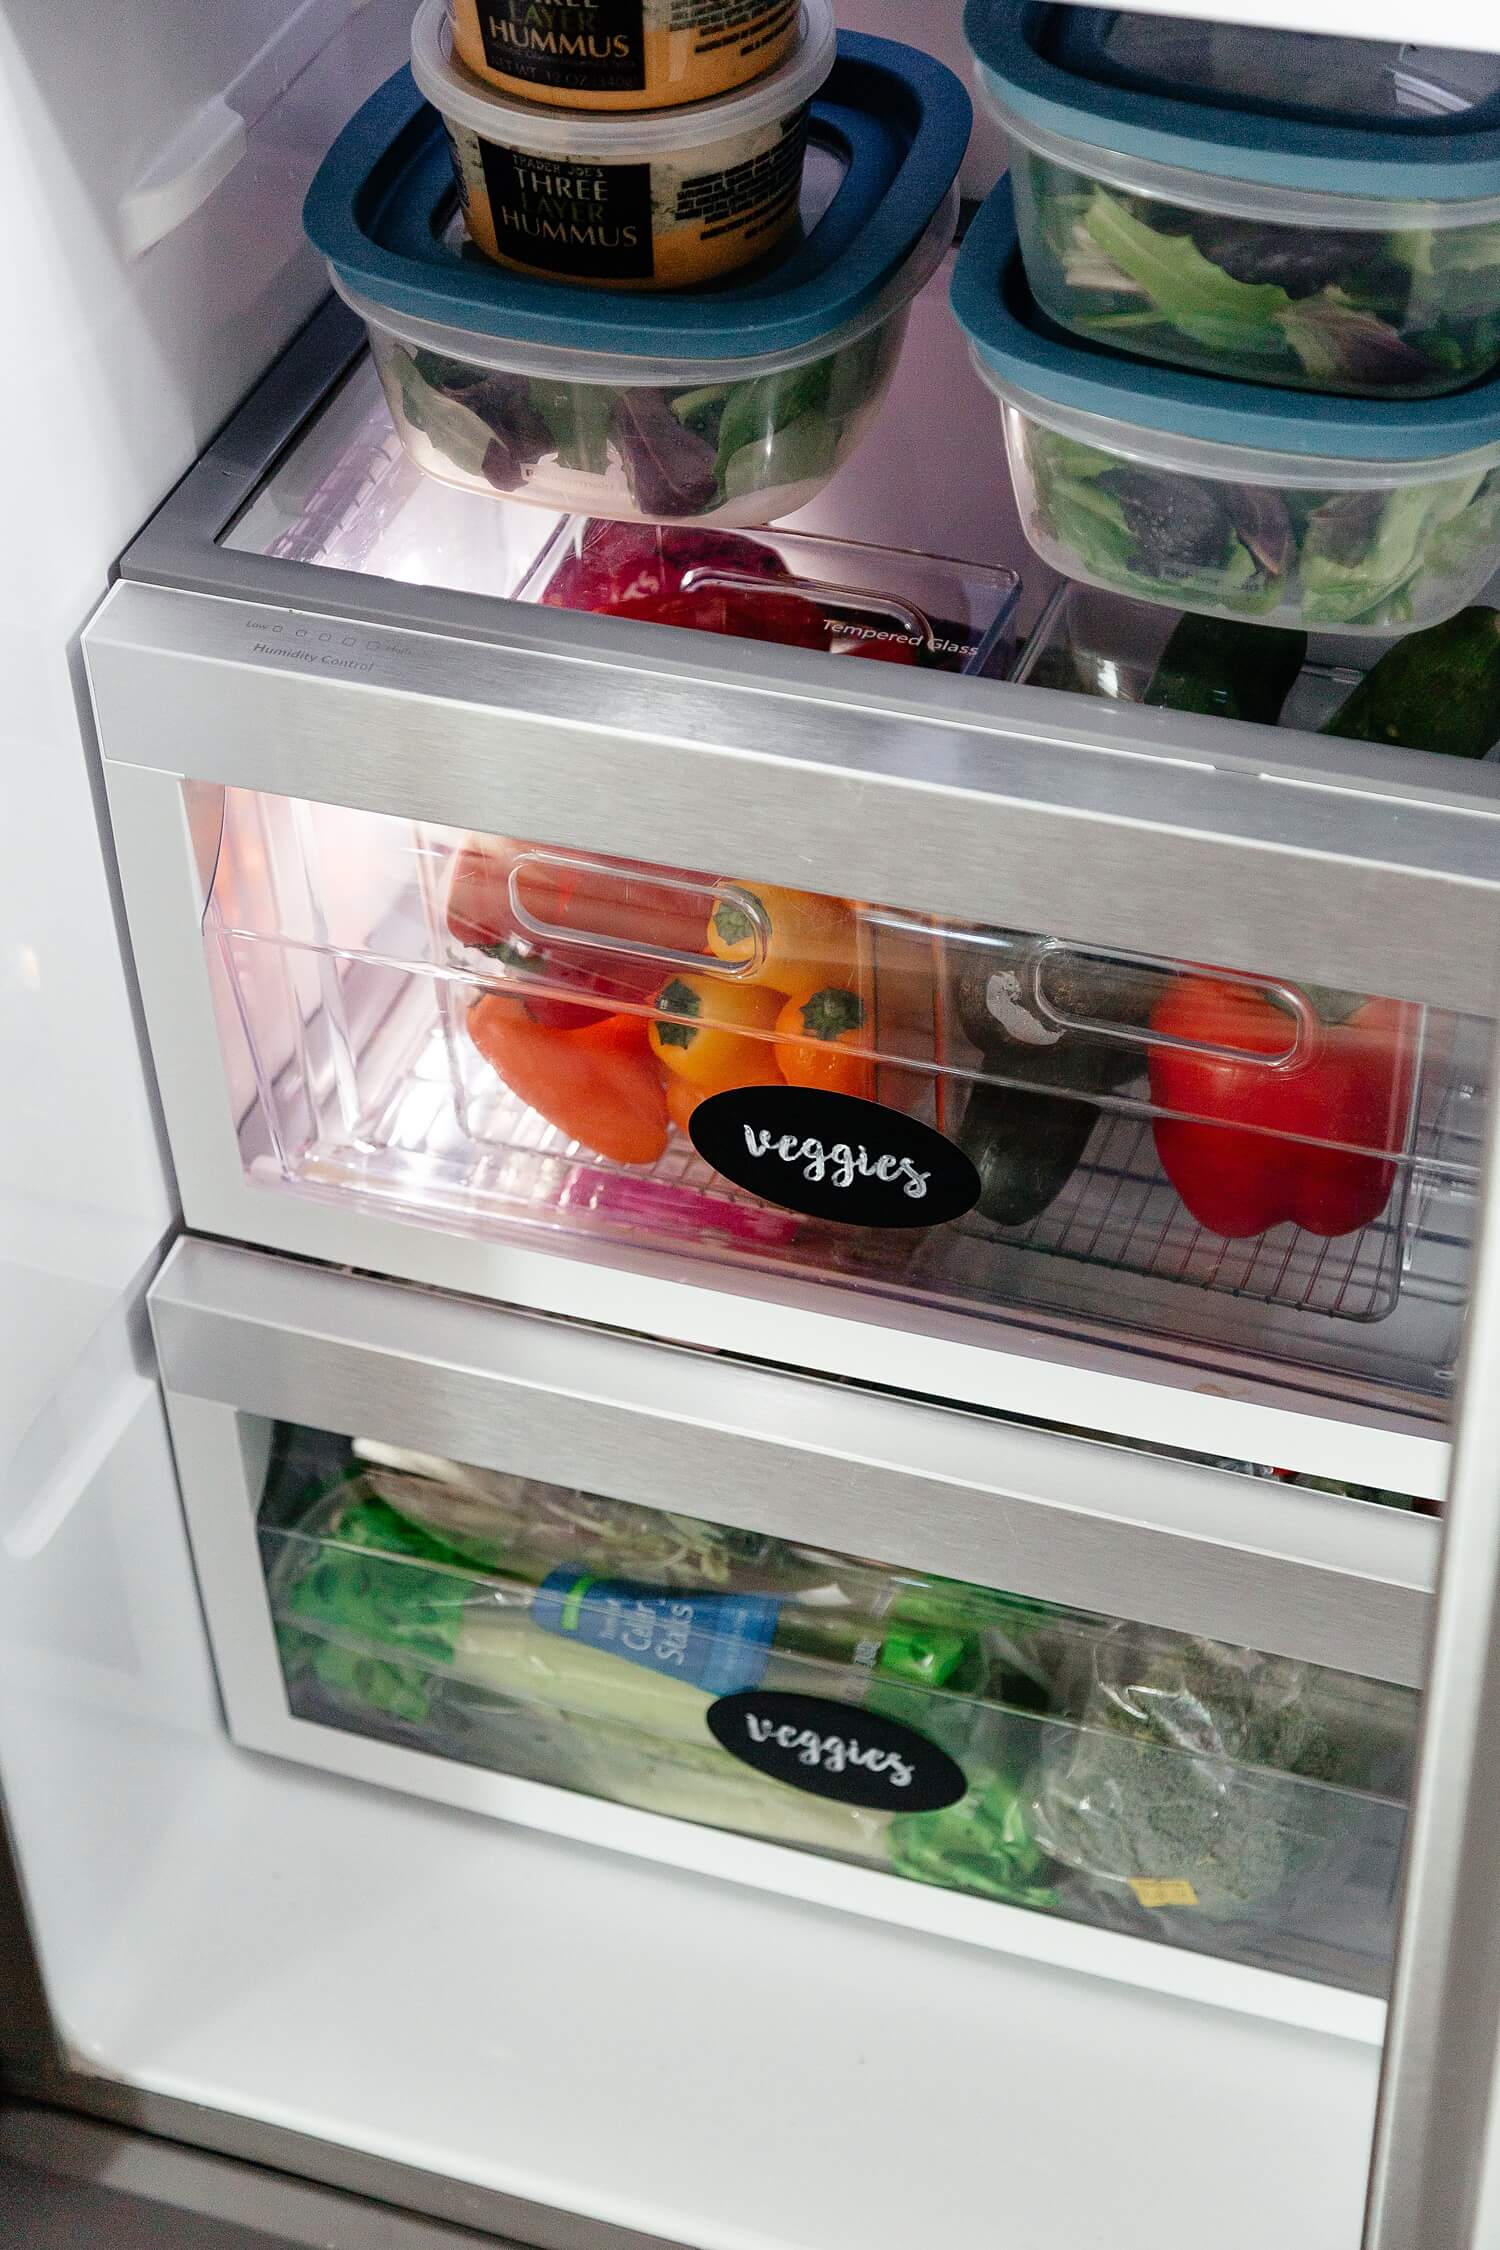
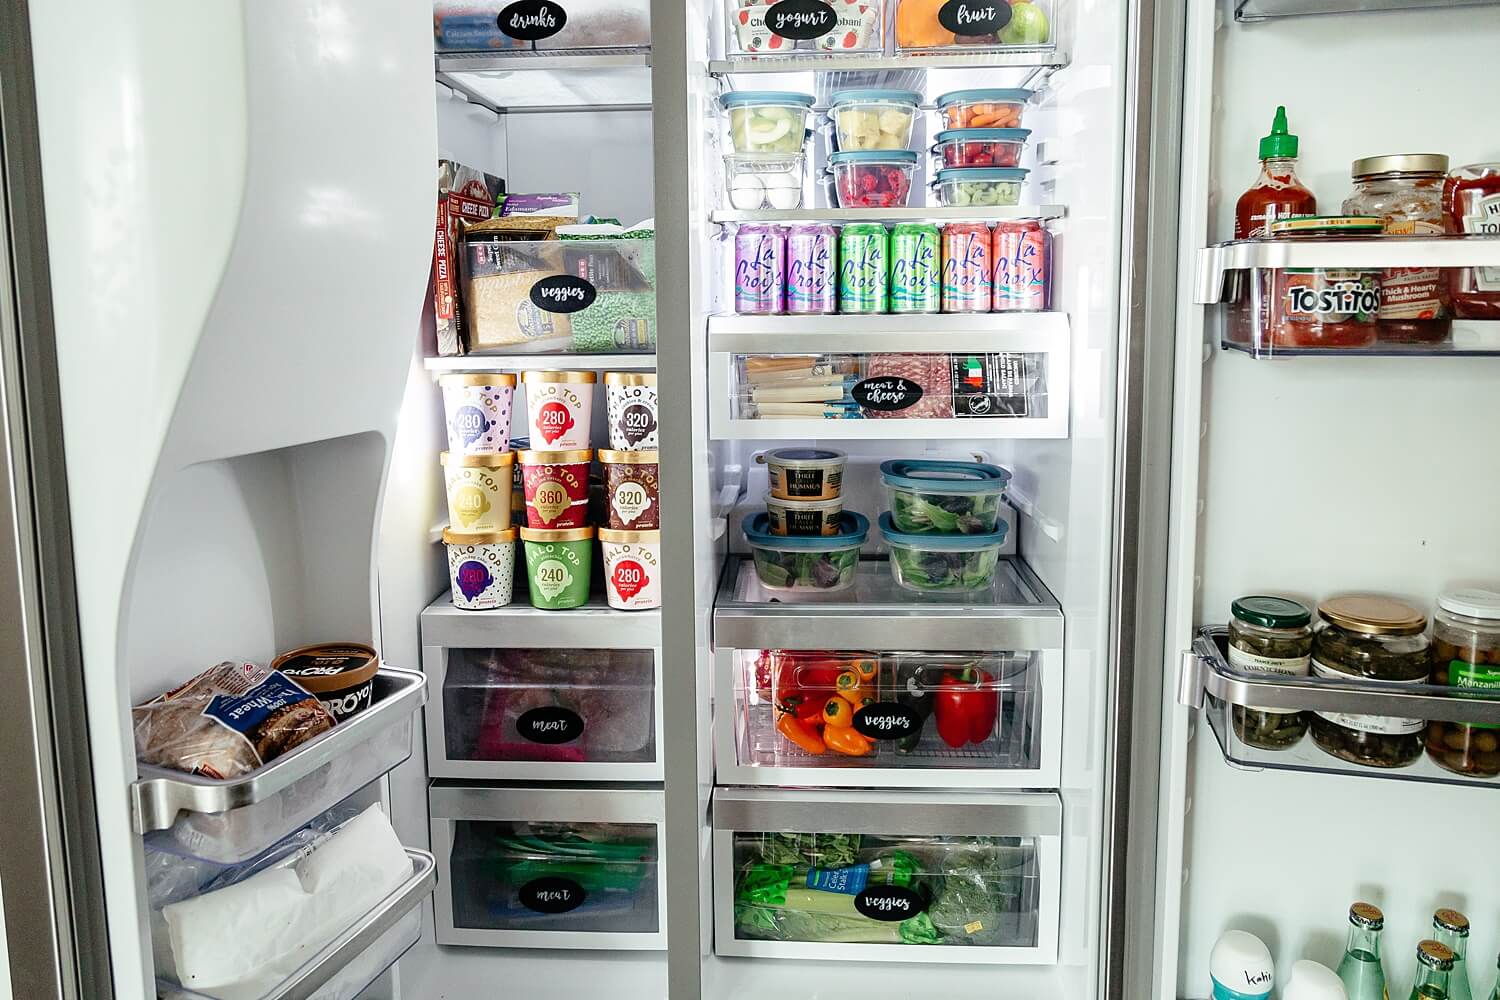
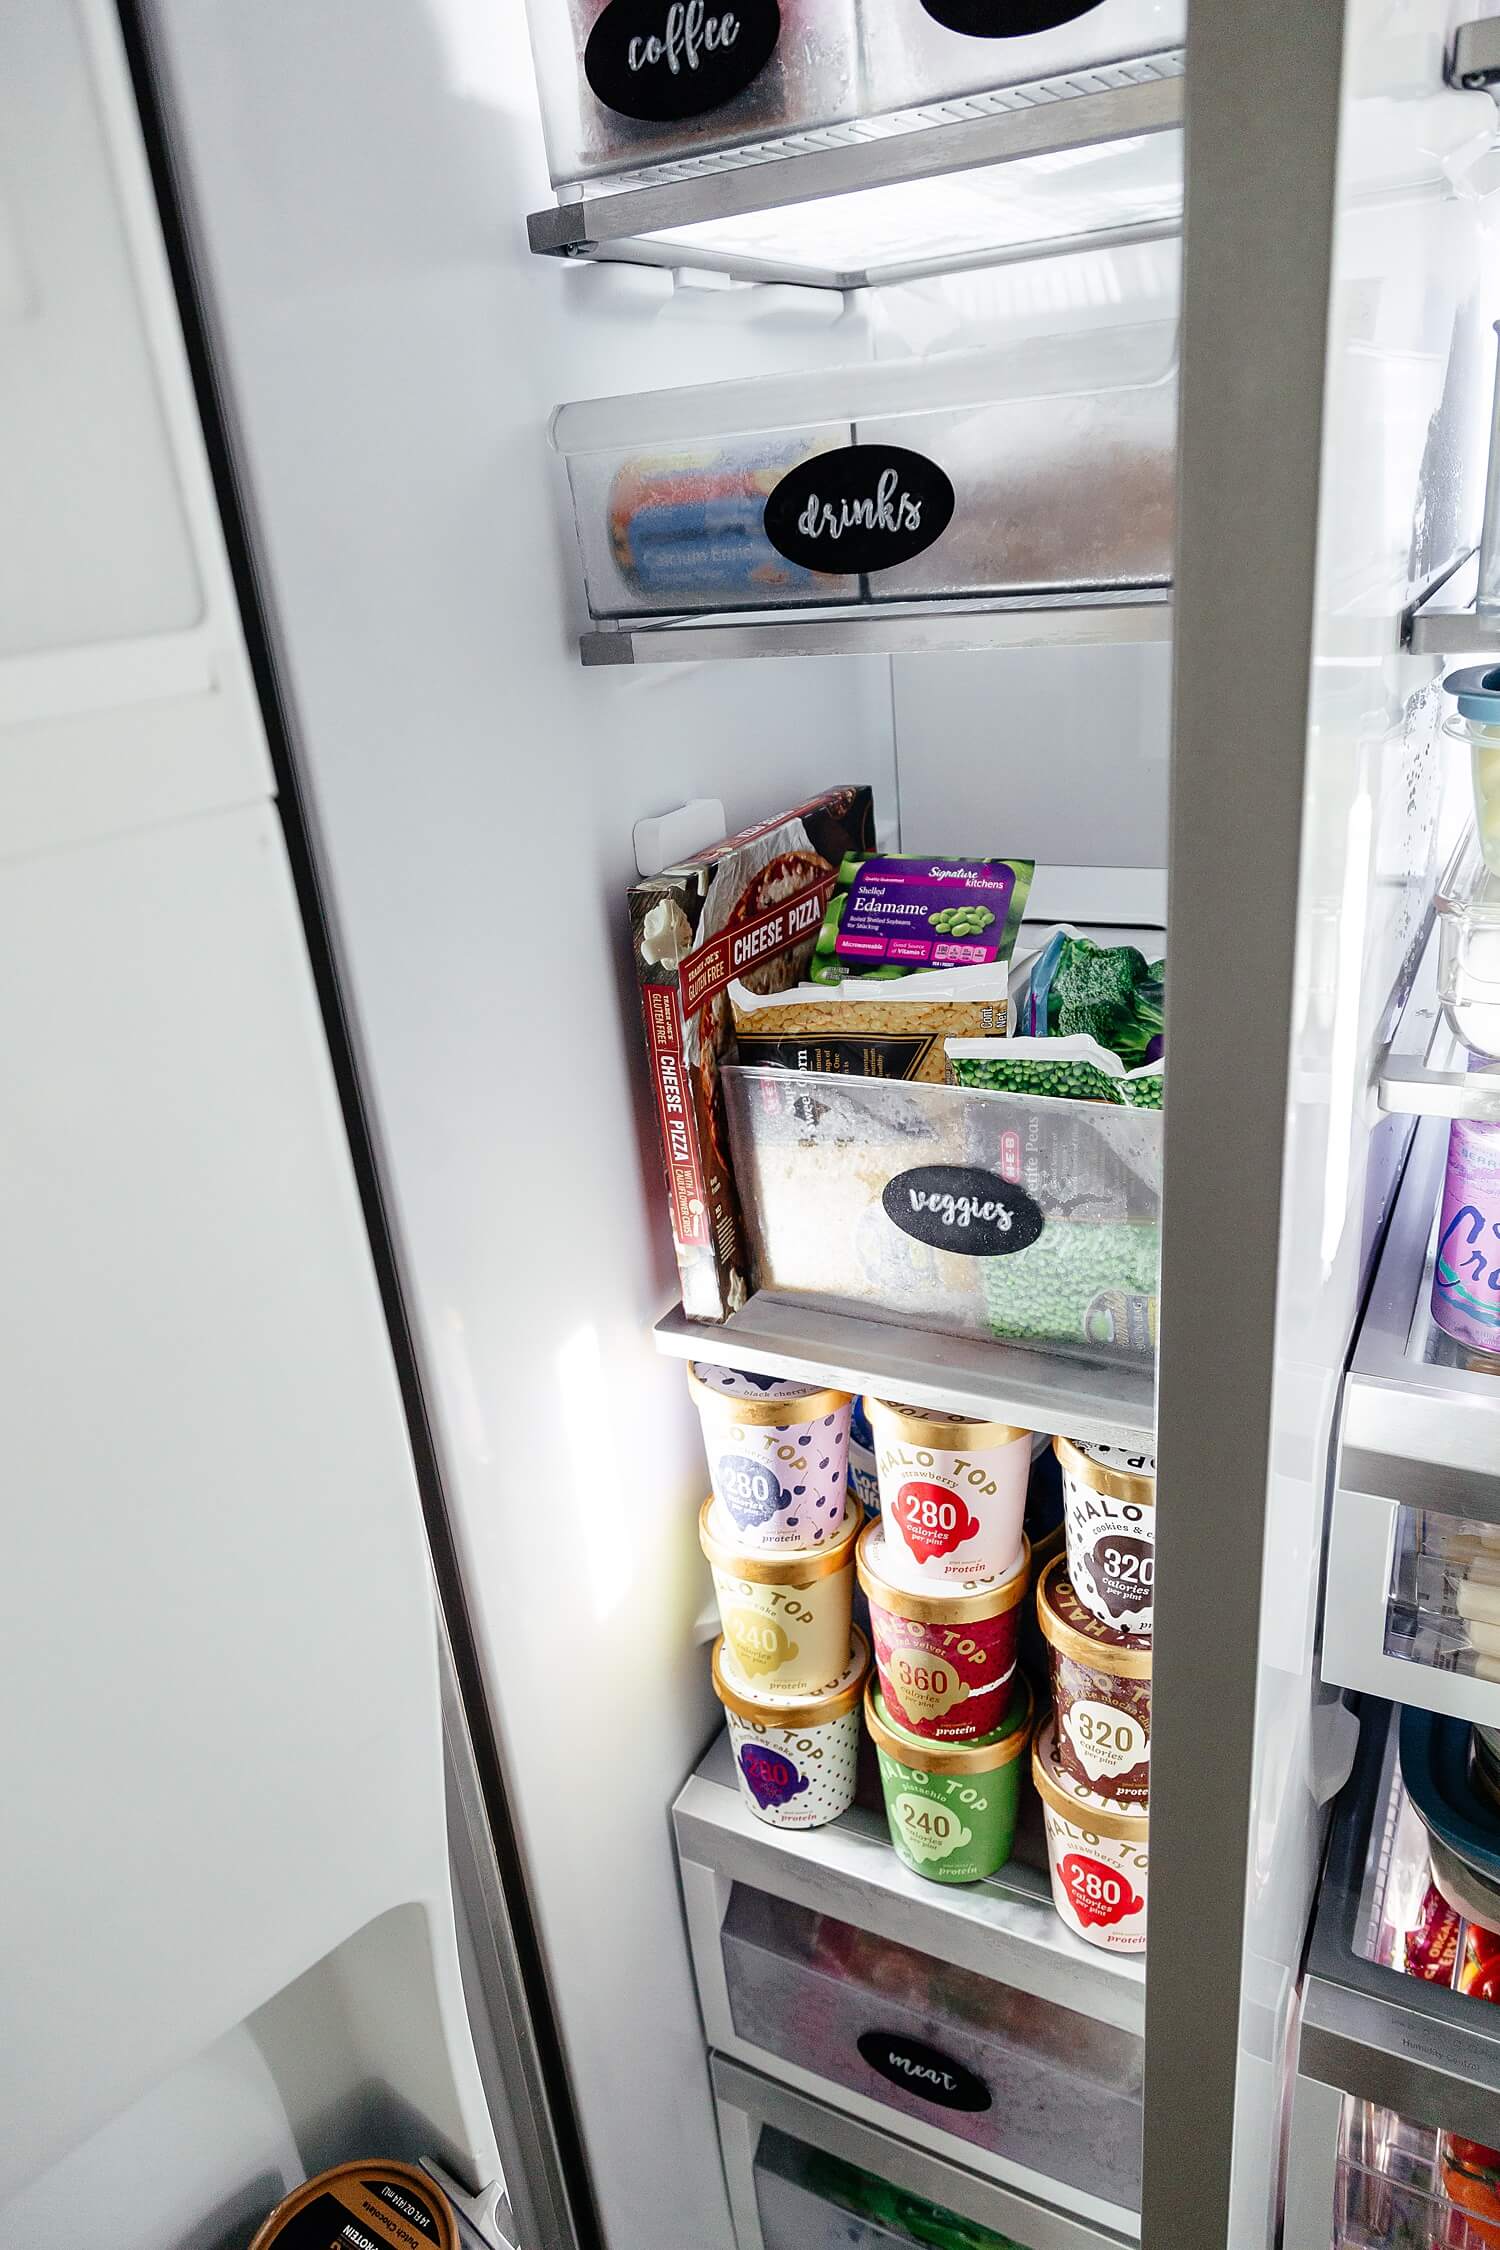
To organize some of the veggies, we used these small pantry bins to keep them separate.
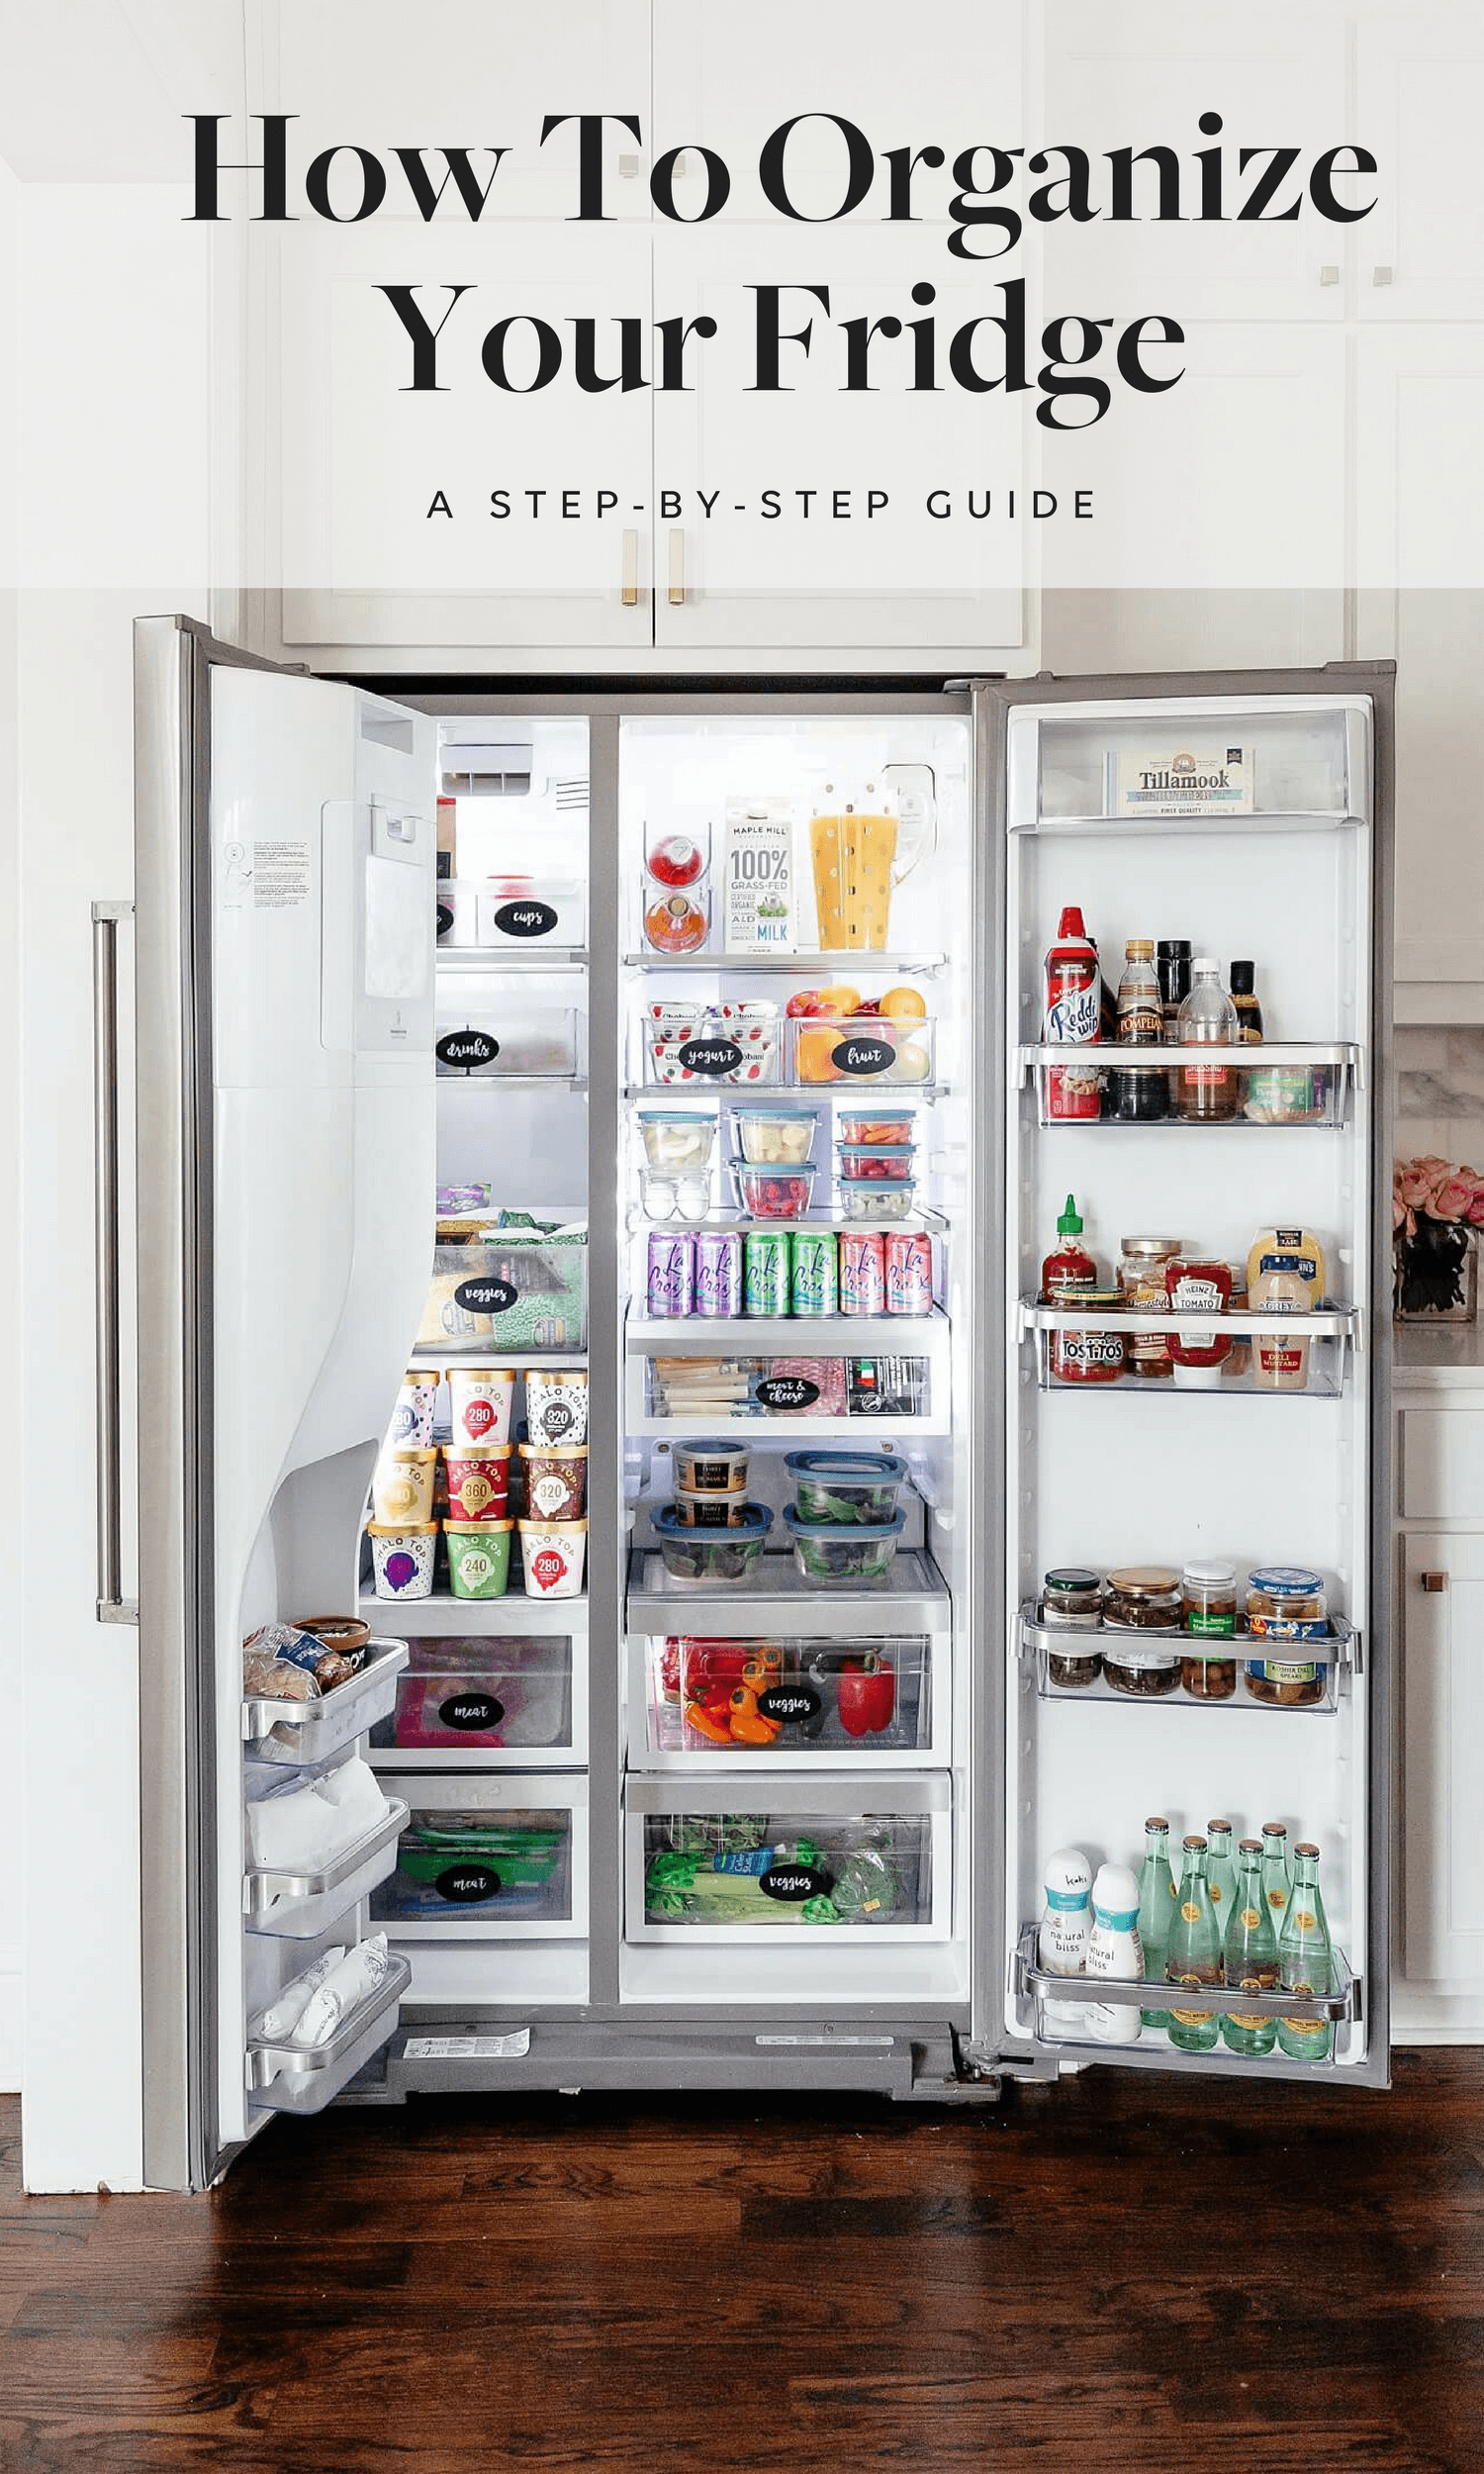
How to Organize Your Fridge: Before
There are a few things to do before you start actually organizing, ughhh I know. These take a while to do but are super important, so just knock ’em out. Ideally you should go through this process every couple months.
Step 1: Take everything out
Start with the stuff in the freezer and then move to the fridge, taking everything out and setting things on your counter tops. Stick anything that might defrost or leave a mess in the sink.
Step 2: Clean
Once everything is out, clean the fridge/freezer with an anti-bacterial solution. Really get in there and clean all sections (like your ice tray, shelves, handles).
Step 3: Toss and take inventory
As you go through your items, note the dates on every single item. Obviously, throw or compost anything that’s expired, and for things that will expire within the next month, mark with a Sharpie. Stuff in the freezer will need your judgment, but chances are if there’s freezer burn, it’s probably been in there too long. Toss!
Then, start writing down anything that you’re tossing or that’s about to be old (Sharpie-marked). This way, you’ll have a running list of everything you need to replace next time you’re at the store. If you’re noticing that you’re throwing away a full jar of something, stop and think about whether you actually need to replace that – or if it was a wasteful buy in the first place.
Step 4: Wipe down
Wipe down things like condiments that might have leaked or are sticky. Open lids and make sure to wipe anything on the inside too (like crusted ketchup, yuck!). Make sure all lids are back on tight and that food is properly closed.
Step 5: Organize
When everything is out on the counters, start organizing your inventory. Place relevant food groups with each other (veggies, cheeses, condiments, fun drinks, etc.)
Step 6: Prep your food
This is actually part of the “after” too, but it’s important to start here now. If you have any fruits or veggies or any food that needs to be prepped, do it now. That might mean cutting up celery and carrots or pulling the chicken off a rotisserie. Do whatever you can (as soon as you get home from the store in the future!) to limit wasted space from other containers – and wasted food in general. More on containers in the next section…
How to Organize Your Fridge: During
OK, so everything is clean and ready to find a home. You’ll probably already be feeling good after decluttering and cleaning, but now, the fun part! (Yes this is fun for me!)
Step 1: Delegate real estate
Depending on how tall you are and who you live with, you want to make the fridge as convenient as possible. That means storing things you don’t use often (certain condiments, chicken stock, soda, etc) on shelves that are harder to reach or in the back. Find your prime real estate and then consider which foods you grab for most often. Tip: If you’re trying to eat healthier, place healthier items in the prime real estate areas (eye level or top shelf).
If you have kids, consider placing their stuff on lower shelves so that it’s easy for them to grab.
Step 2: Know how to store
The lowest part of your fridge tends to be the coldest (since heat rises), so try to keep things like your milk in those areas. My fridge is super skinny and I really only have the top shelf for milk gallons, so I’m out of luck there. But if you can, keep things that can spoil easily towards the bottom.
Store eggs and other delicate items in the fridge, not in the door (even though that’s where the “egg” area usually is).
Step 3: Use the right containers
If you’re about to clean your fridge, it’s time to start thinking about containers that would help. First, measure inside your fridge and freezer to see what type of space you’re working with, and ideally buy containers that match up. You don’t want the containers covering every inch of a shelf (you won’t be able to reach behind them), so don’t clutter too much in if you can help it. Getting containers or certain storing options can really help down on wasted space of store-bought containers or cartons though.
Square or rectangle tupperware/containers take us less wasted space than a circle, so if room is sparse, go with one of those shapes.
Consider buying jars that fit well within your shelves or doors for things like condiments, since condiments always come in funky shapes and sizes. Downsize things like salad dressings once you’ve used some of them up too.
Essentially, take note of every single container in your fridge and think “would this make more sense in a different shaped/sized container?”. If so, do it.
Step 4: Utilize drawers
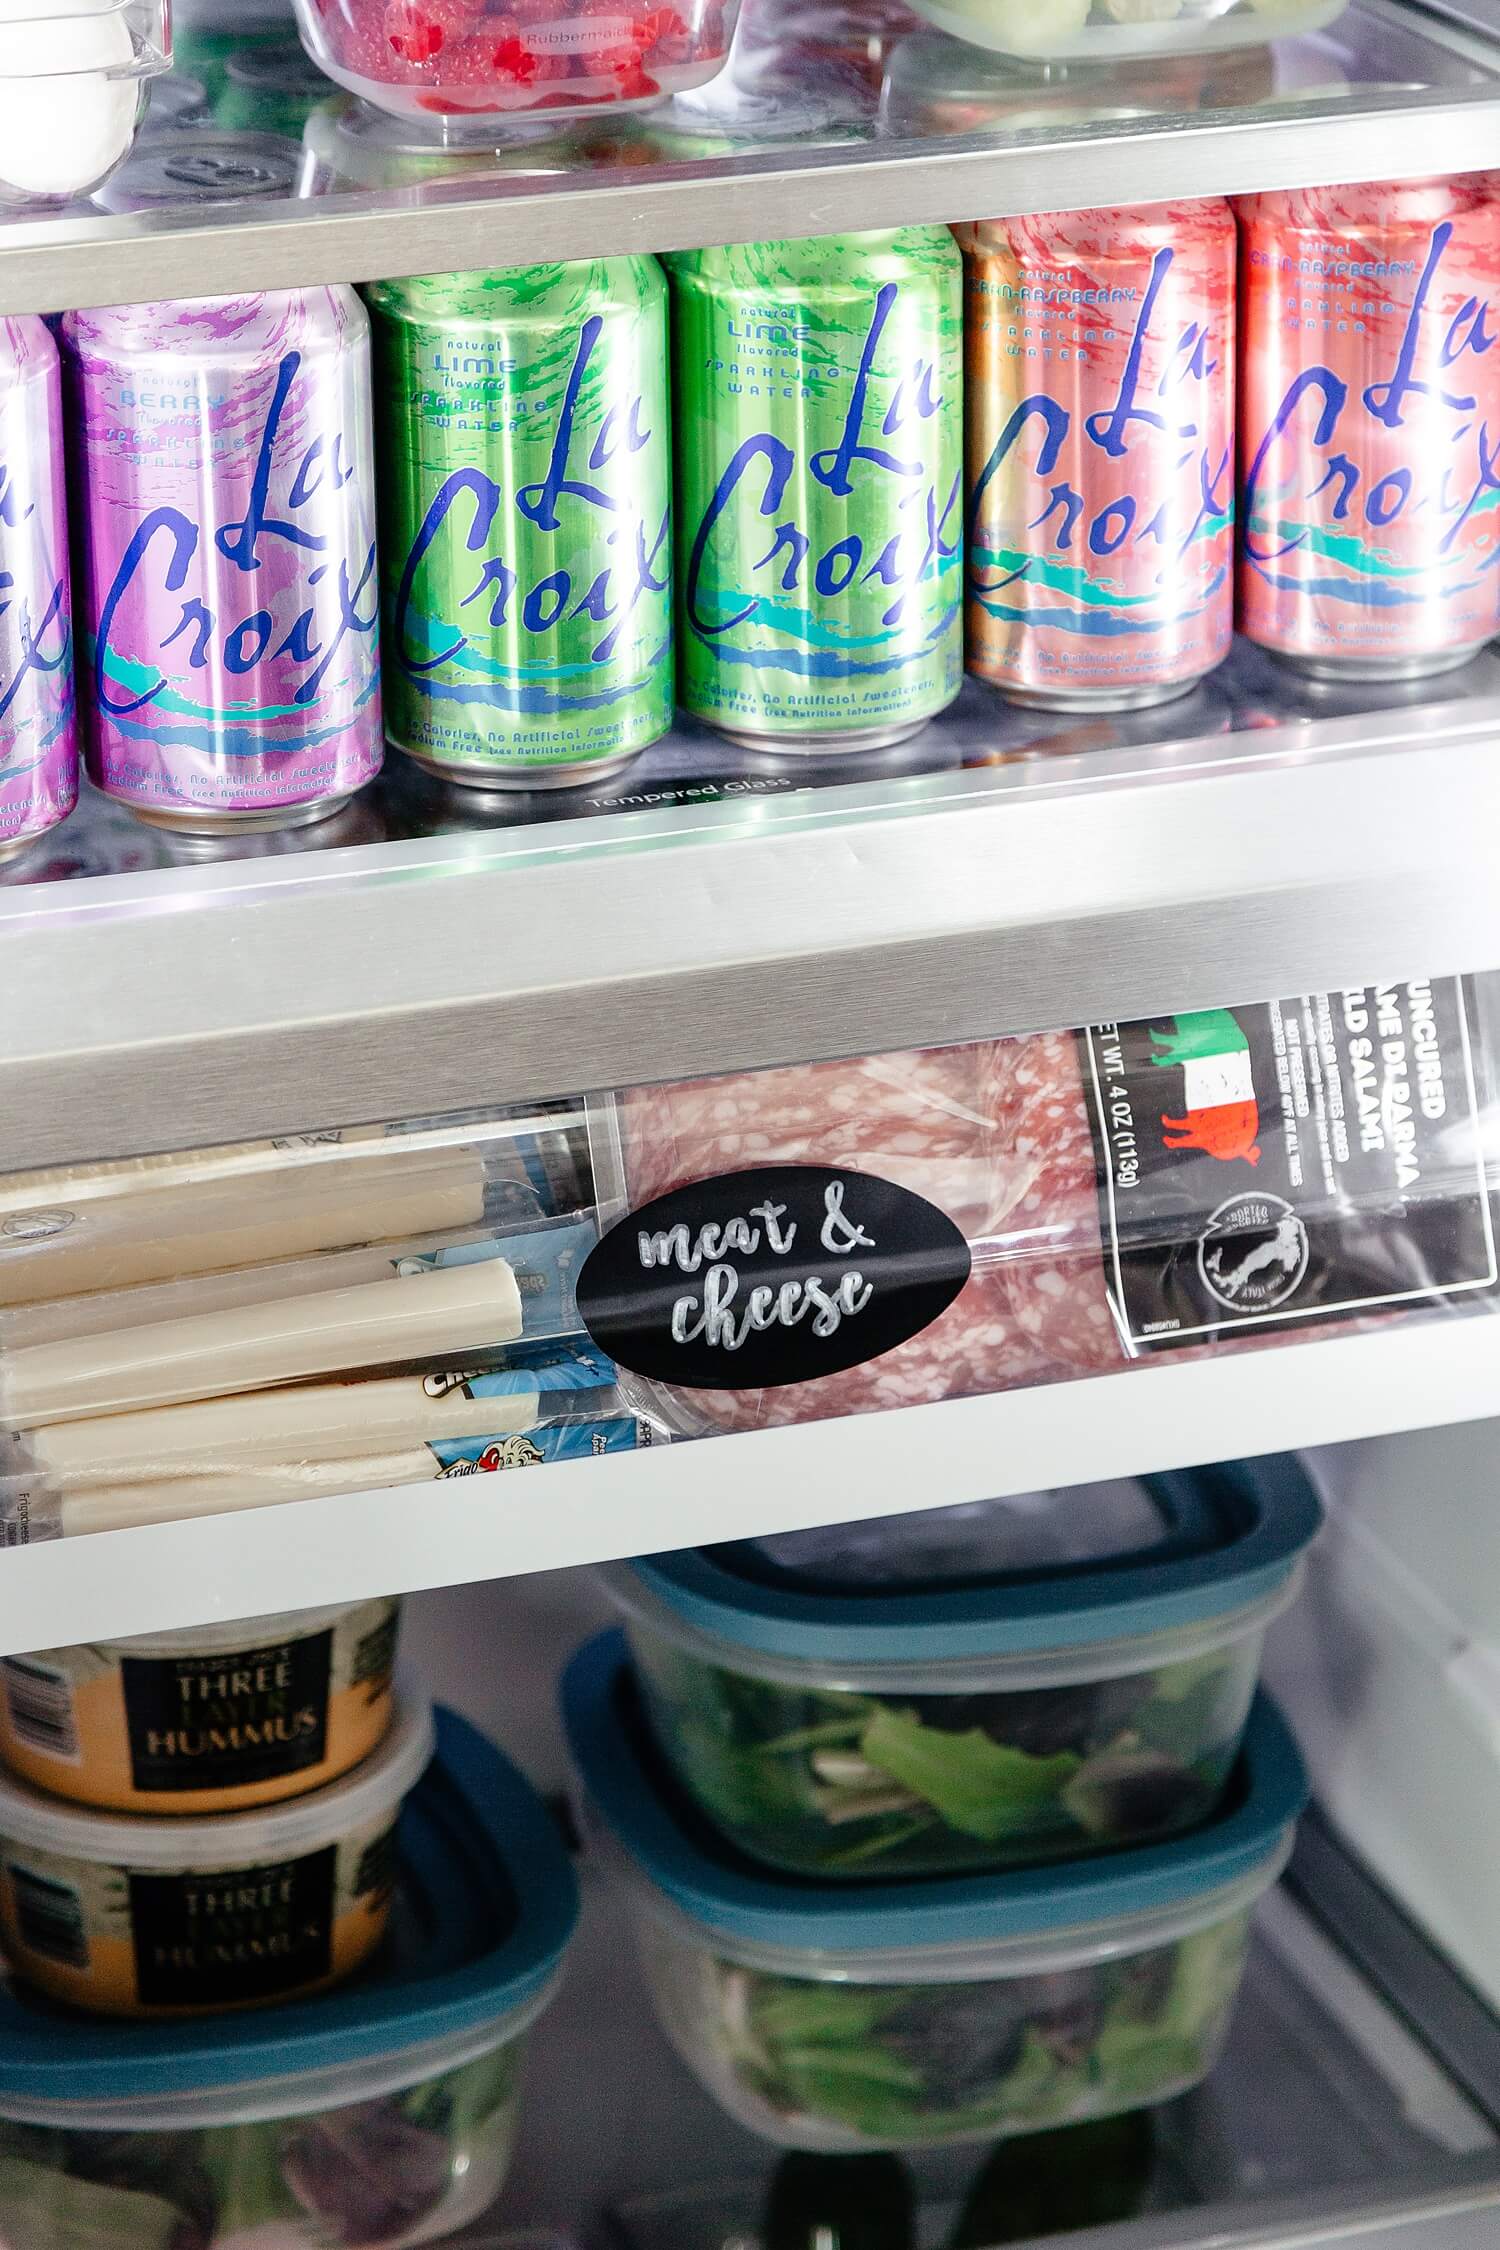
Drawers shouldn’t be clogged up with pre-packed items,and should instead serve as a catch-all for similar things. Use your drawers for storing vegetables, fruit, and random items like string cheese (that don’t really belong in a separate container). This is where non-delicate items can be placed.
Step 5: Label
This is especially helpful if you share the fridge with others. Label each drawer for what should go in there, and same with any other designated area in your fridge (even the containers!).
Step 6: Stack freezer by use
A freezer can get out of hand fast if you don’t utilize the space well. Stack similar shapes together, like pizza boxes or meat containers. Then, buy a few containers to store relevant items (like frozen vegetables together, frozen meal leftovers, kid-friendly food, etc). Label everything so that you can get in and out of the freezer quickly and food in there doesn’t go to waste.
If space is limited, consider smaller, stackable ice trays instead of an entire drawer full of ice.
Step 7: Leave empty space
If you can manage (which I really couldn’t), leave a designated “open space” in your fridge. This will be super helpful for any weekly leftovers, when something has to sit for a few hours, etc. It’ll simply feel less cramped too if there is some area that isn’t. But only if you have the space obviously!
How to Organize Your Fridge: After
OK, most of the work is done…in fact, everything is done for now! But, like with any areas that you’ve organized, you’ll want to develop a few habits to keep things in place – literally. Here are a few tips I’ll leave y’all with that will help maintain that beautiful fridge of yours:
- Have weekly clean-outs. Before you go to the grocery, take inventory of your fridge. Is the celery still good? Enough milk for the next week?
- As you use condiments and the like, check the dates. Keep the Sharpie system intact and mark things once they come within about a month of being old, then write that item down on a running grocery list.
- Once a month, take everything out and clean the fridge, freezer, and your items (don’t forget the drawers!).
I hope this helps! I think you’ll really enjoy how good this feels and how much less food you’ll waste (since you can see everything better or know what’s where).
Do you have any fridge organization tips that I’m forgetting?
*
I linked up some of the products we used to organize the fridge, but I think the most helpful part is just going through the steps + being intentional about how you put things inside your fridge. And being consistent about cleaning it out each week!
Here’s a round up of the products used:

And here are a few images of the freezer:
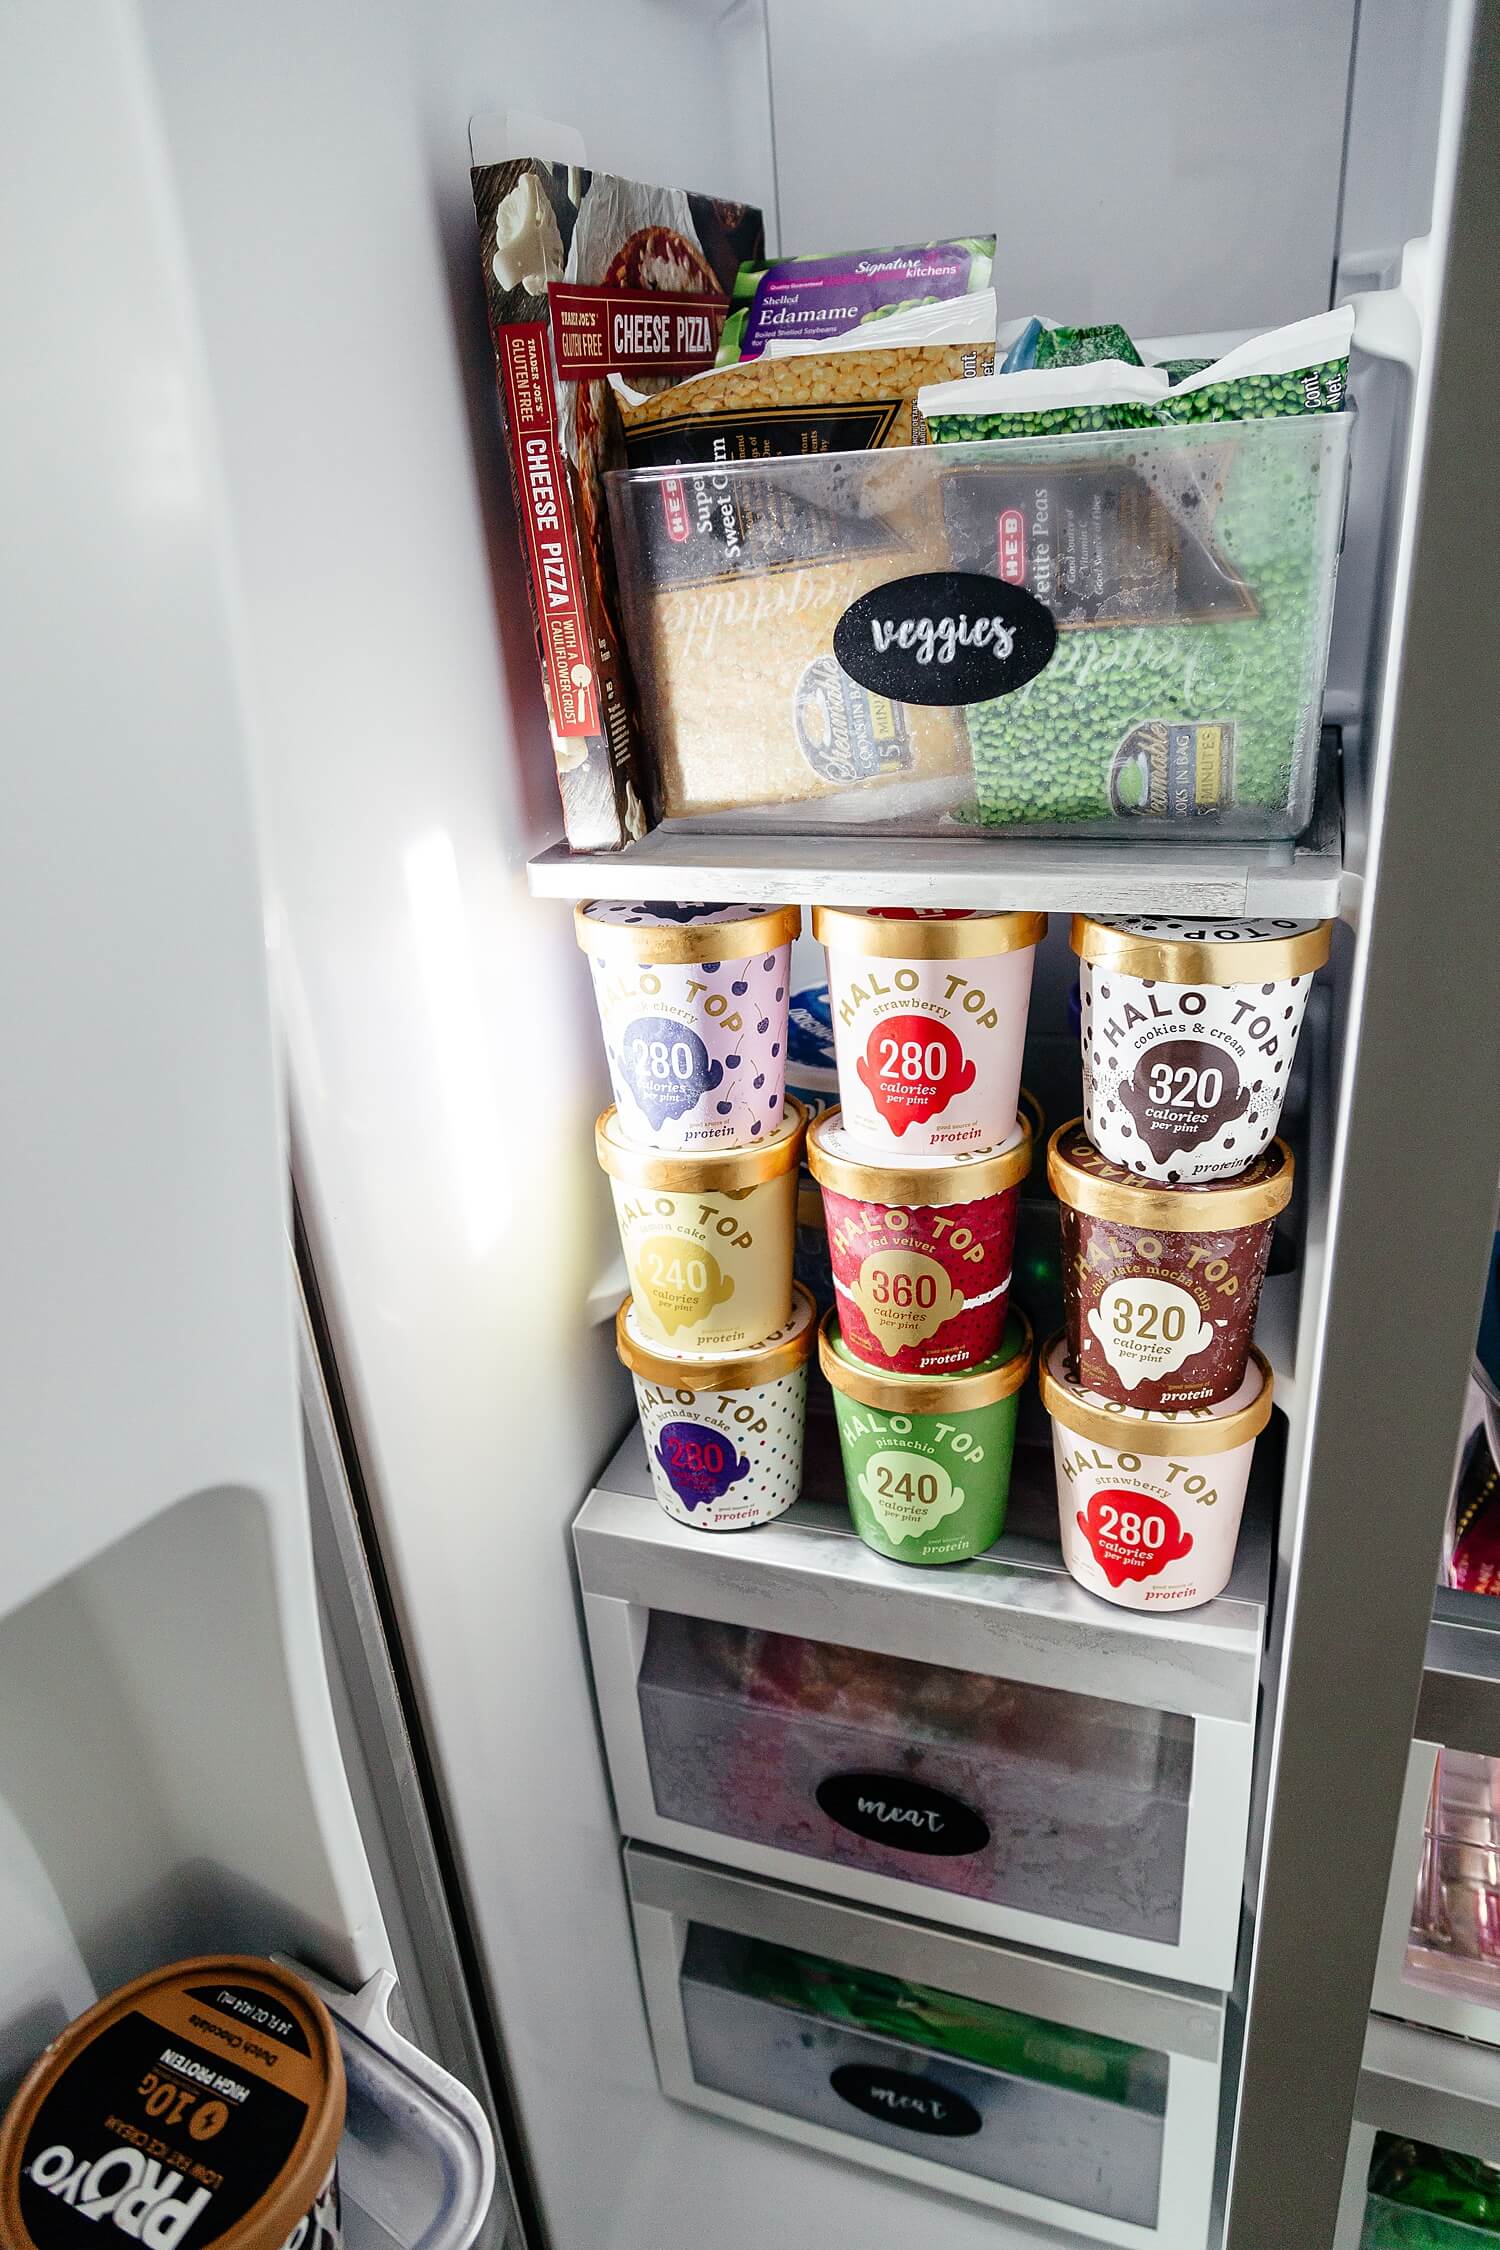
We used these shallow containers for the coffee + cups and then this deeper one for frozen veggies.
Since this article has a lot of images, I went ahead and made you a pretty (image-free) downloadable PDF in case you wanted to print out the blog post! Enjoy!